A Review of macOS Control Bypass (OSMR) Certification and Exam

EXP-312-OSMR-Certification

OffSec’s macOS Control Bypass (OSMR) Certification is a special badge for cybersecurity experts who want to learn how to sneak past macOS security measures in real-world situations. As macOS becomes more popular in big companies, this certification is becoming a really valuable skill.

In this article, I’ll tell you everything you need to know about the OSMR certification, from what the course is like to how the exam works. I’ll also give you some tips to help you ace it. Whether you’re thinking about getting this certification or just curious about it, you’ll find this information helpful.

Background

Offensive Security (OffSec) has built a solid reputation in the cybersecurity world thanks to its hands-on, practical approach to training. Their certifications, like the OSCP (Offensive Security Certified Professional) and OSCE (Offensive Security Certified Expert), are highly respected by professionals and employers alike. The OSMR (macOS Control Bypass) certification is a bit more niche, focusing specifically on macOS security and the techniques used to bypass its built-in protections.

The OSMR exam challenges you to identify and exploit vulnerabilities within macOS systems, skills that are becoming more crucial as Apple devices gain popularity in enterprise environments. If you’re working with or around Apple ecosystems, mastering macOS security and control bypassing is a superpower!

As someone who’s been using Mac for over a decade, I’m pretty familiar with the ins and outs of macOS. Plus, since macOS is a Unix-based system and I have a solid foundation in Linux, I definitely feel like I have an edge when it comes to understanding macOS from both a user and security perspective.

Course Info

The OSMR course offers hands-on experience and is designed for those serious about mastering Apple’s operating system. It focuses on two crucial areas: local privilege escalation and bypassing macOS security controls like System Integrity Protection (SIP) and Transparency, Consent, and Control (TCC).

Throughout the course, you’ll look into macOS system internals, gaining a deeper understanding of how the OS functions internally. This knowledge is essential for discovering vulnerabilities, exploiting weaknesses, and ultimately bypassing protections to gain control over macOS systems. You’ll also explore real-world vulnerabilities—both within macOS itself and in third-party applications—and learn how to identify and exploit them.

Previously, the course content was based on Intel architecture, but with the shift to Apple’s new ARM-based Macs, as of this writing in February 2025, the course has been fully updated to focus on the latest ARM architecture. This update ensures you’re learning the most relevant techniques for exploiting and bypassing macOS security on Apple’s newest architecture.

The OSMR course starts at $1,749, which might be steep for some, but the value is undeniable for serious security researchers. Additionally, since remote labs are discontinued, you’ll need a MacBook with an M-series chip and 1TB of storage for your local lab setup, adding another $1,000 to the total cost.

Syllabus Overview
  1. macOS Control Bypasses
  2. Virtual Machine Setup Guide
  3. Introduction to macOS
  4. macOS Binary Analysis Tools
  5. The Art of Crafting the Shellcodes
  6. Dylib Injection
  7. The Mach Microkernel
  8. XPC Attacks
  9. Function Hooking on macOS
  10. The macOS Sandbox
  11. Bypassing Transparency, Consent and Control (TCC)
  12. Gatekeeper Internals
  13. Bypassing Gatekeeper
  14. Symlink & Hardlink Attacks
  15. Injecting Code into Electron Apps
  16. Penetration Testing on macOS

* please refer to official website for more up-to-date information about the course content.

The Exam

The OSMR certification exam was not so easy because it puts your knowledge of exploit development and security control bypasses to the limit. It’s not an exam you can just walk through without serious preparation. The exam has four tasks, each focusing on important areas like reverse engineering, crafting exploits, bypassing security measures, and creating custom shellcode—all of which are covered in the course. While the exam tests your technical skills, it also requires you to think critically and logically about how to approach each task. You’ll need to apply the course material in ways that allow you to work through complex scenarios under pressure. The tasks are designed to reflect real-world exploit development challenges, so a solid understanding of both theory and practice is essential.

We have 47 hours and 45 minutes (almost 2 days) to complete the exam. It might seem like a lot of time at first, but it’s actually just the right amount of time to test both your technical skills and your time management skills. You need to obtain 70 points out of 80 points to earn the certificate. The exam is not very challenging but thoroughly tests most of the concepts taught in the course, and it definitely represents the key takeaways from the course.

One important lesson I learned: you need to understand not just how to solve each task, but how the tasks interconnect with the overarching concepts of the course. If you’re unclear on the big picture, you’ll likely struggle. The exam really emphasizes the importance of having a solid, repeatable methodology for exploit development and testing. I strongly recommend taking the time to not only complete the course but also to synthesize your own methodology for macOS exploitation before attempting the exam.

I originally scheduled my exam for December 17, 2024, at 11:00 PM UTC+5, but unfortunately, it got canceled due to some unexpected maintenance, so I had to reschedule. I chose January 26, 2025, at 5:00 AM UTC+5 for my new exam date and here’s how the day went:

04:45 AM: Logged into the proctoring system for the identity check.
05:05 AM: Got my VPN credentials, but hit a roadblock—couldn’t connect from my Mac host. Tried transferring the Kali VM, but still no luck. 😢
06:45 AM: Finally solved the issue by adjusting the MTU size and managed to get connected to the VPN.
06:55 AM: Tested the portal connectivity and decided to take a short break to reset.
07:10 AM: Came back, joined the exam, and quickly skimmed through all the challenges.
07:20 AM: Decided to tackle the challenges in order, starting with Challenge 1.
07:50 AM: Discovered the first vulnerability and started working on the exploit.
08:30 AM: Took a break for breakfast.
09:15 AM: Ran into a problem—the exploit code wasn’t working, so I started testing alternative approaches.
10:30 AM: Finally, after a lot of trial and error, I had a working payload!
10:50 AM: Successfully exploited the target and set up persistence.
11:00 AM: Took another break.
11:15 AM: 10 points down, so I started the second challenge worth 30 points.
11:30 AM: Shortlisted a few exploit pathways.
01:25 PM: Got to the end of my shortlisted paths, but all of them were failing.
01:30 PM: Took a break for lunch to clear my head.
02:15 PM: Finally found the right exploit pathway, so I worked on preparing the payload.
02:30 PM: Target exploited and persistence achieved.
02:45 PM: Took another quick break to refresh.
03:00 PM: 40 points down, now onto the next 30-point challenge.
03:30 PM: This one was a bit tricky, but thanks to my prior Linux experience, I knocked it out in about 10 minutes. 😉
03:50 PM: Reviewed the last challenge and took another short break.
04:20 PM: Wasn’t too worried about this challenge since I had a good sense of how to approach it, so I dove in with confidence.
05:30 PM: Made a silly mistake—ended up troubleshooting it for over two hours.
07:45 PM: Finally got the payload fixed and had completed all the challenges.
08:00 PM: Took a break to get some sleep.
09:00 AM: Woke up, and reviewed all the screenshots and details.
10:00 AM: Began writing the report.
02:00 PM: Finished the report and wrapped up the exam.
05:00 PM: Sat down for another two hours to review and polish my report.
07:30 PM: Submitted my report to Offensive Security.

Then, after four days of waiting, I finally got the email I had been hoping for: “We are happy to inform you that you have successfully completed the macOS certification exam and have obtained your Offsec macOS Researcher (OSMR) certification.” 🎉

It was a rollercoaster of a day, but it felt amazing to finally cross the finish line!

Resources

When preparing for the OSMR exam or diving into macOS research, there are a few key resources I found extremely helpful. While the course itself is comprehensive, these additional materials can really help deepen your understanding of macOS internals, security, and exploitation techniques.

  • OS Internals Books (https://newosxbook.com/jbooks.html)
    These books dive into macOS internals in three parts: user mode, kernel mode, and security. They’re packed with detailed information and even discuss real-world vulnerabilities, like the ones used in the Pegasus ZeroClick RCE attack.
  • The Mac Hacker’s Handbook (https://www.amazon.com/Mac-Hackers-Handbook-Charlie-Miller/dp/0470395362)
    This is a must-read for anyone interested in macOS security. Written by Charlie Miller, it covers a wide range of hacking and exploitation techniques for macOS.
  • Eclectic Light (https://eclecticlight.co/mac-problem-solving/)
    The Eclectic Light website has a ton of valuable articles on macOS technologies. It’s great for understanding how macOS works under the hood and for troubleshooting various macOS-related issues.
  • Sektion Eins Blog (https://www.sektioneins.de/categories/blog.html)
    This site features in-depth vulnerability analysis and exploit research focused on macOS, making it an excellent resource for security researchers.
  • Objective-See Blog (https://objective-see.org/blog.html)
    Known for its macOS security tools, Objective-See also has a great blog that covers vulnerabilities and security techniques for macOS.

Additional Research Resources:

  • Apple Developer Documentation: (https://developer.apple.com/documentation/) – Official Apple documentation for APIs and macOS internals.
  • PRZHU’s Blog: (https://przhu.github.io) – A blog with vulnerability analysis and research on macOS.
  • Knight Security Research: (https://knight.sc) – Security-focused site with research on macOS and other platforms.
  • The Evil Bit: (https://theevilbit.github.io/posts/) – Exploit research and vulnerability analysis, including macOS.
  • Nshipster: (https://nshipster.com) – A developer resource for macOS technologies and APIs.
  • HackTricks – macOS Red Teaming: (https://book.hacktricks.xyz/macos-hardening/macos-red-teaming) – A comprehensive guide for red teaming techniques on macOS.

These resources will be incredibly helpful whether you’re working through the OSMR exam or just expanding your knowledge of macOS security. The more you familiarize yourself with these sites, the better equipped you’ll be to handle the challenges in the exam and beyond.

FAQs

Before jumping in, make sure you’re comfortable with these topics:

  • x86-64 Assembly: You’ll be diving into reverse engineering and exploitation, so understanding assembly is key.
  • C & Objective-C Programming: You’ll need to read and write C code, as well Objective-C, as it’s crucial for exploit development.
  • Debuggers and Exploit Development: Having hands-on experience with tools like GDB or LLDB will make things much smoother.

You’ll know you’re ready when you’ve worked through all the exercises (and gone the extra mile). If you feel confident about the material and have a good grasp on everything, then it’s exam time! Just make sure you’ve really internalized the concepts before hitting submit.

The course is mainly focused on macOS, so it won’t teach iOS exploit development directly. However, many of the skills and concepts you’ll learn here—like reverse engineering, and exploit creation—are transferable to iOS. It might not be a direct path, but it can definitely point you in the right direction.

It can take up to 10 business days to get your results, but don’t worry, it’s usually faster. For me, I got my results in about 4 days after submitting the exam report.

If you need more details or have questions, check out these resources:

  • EXP-312: Advanced macOS Control Bypasses – The official course page.
  • EXP-312: OSMR Exam Guide – All the info you need specifically for the exam.
  • OSMR Exam FAQ – The official FAQ from OffSec.
  • For real-time help, join OffSec’s Discord. There’s a channel specifically for EXP-312 (exp-312-general) where the community can answer your questions.

Yes! A good understanding of both Intel and ARM assembly will be super helpful, especially since a lot of the course revolves around reverse engineering with tools like Hopper. Also, being comfortable with C and Objective-C will make a big difference when you’re reading source code and working on exploits. Finally, some basic knowledge of macOS technologies (like XPC and TCC) will help you absorb the material more easily and give you a clearer understanding of how macOS works.

If your goal is just to get the certificate, then yes, the exercises and extra miles will more than prepare you for the exam. The exam itself isn’t overly difficult as long as you’ve done the work. But if you want to really push yourself and dig deeper, I’d recommend going beyond the exercises and practicing even more. That way, you’ll get a more thorough understanding of the material.

You’ll need Hopper or another disassembler to tackle the reverse engineering tasks. It’s also a good idea to be familiar with debugging tools like LLDB, Radare2, or Cutter. Since the exam is remote, make sure your setup is solid and you’re comfortable with all your tools before diving in. It’s important to double-check that your system meets the exam requirements to avoid any surprises. And just a heads-up—since labs are discontinued in November 2024, you’ll need to set up your own lab environment for the exam.

Conclusion

I’m really glad I took the OSMR course. It expanded my understanding of macOS security and made me a better pen tester. While the price might be a bit high for some, especially with the discontinuation of labs, it’s definitely worth it if you’re serious about security research in the Apple ecosystem.

For the exam, managing stress is key, take breaks when needed, and make sure to practice all the exercises. The course content is top-notch, constantly updated, and it’s one of the best resources out there for macOS exploitation.

Whether you’re a pen tester, security researcher, or macOS developer, this course is a fantastic choice. It teaches you the skills you need to approach real-world macOS security challenges. I’d take it again in a heartbeat and look forward to what’s next with OffSec.

How to Fix macOS Sequoia Firewall Issue?

Mac-OS-Sequoia

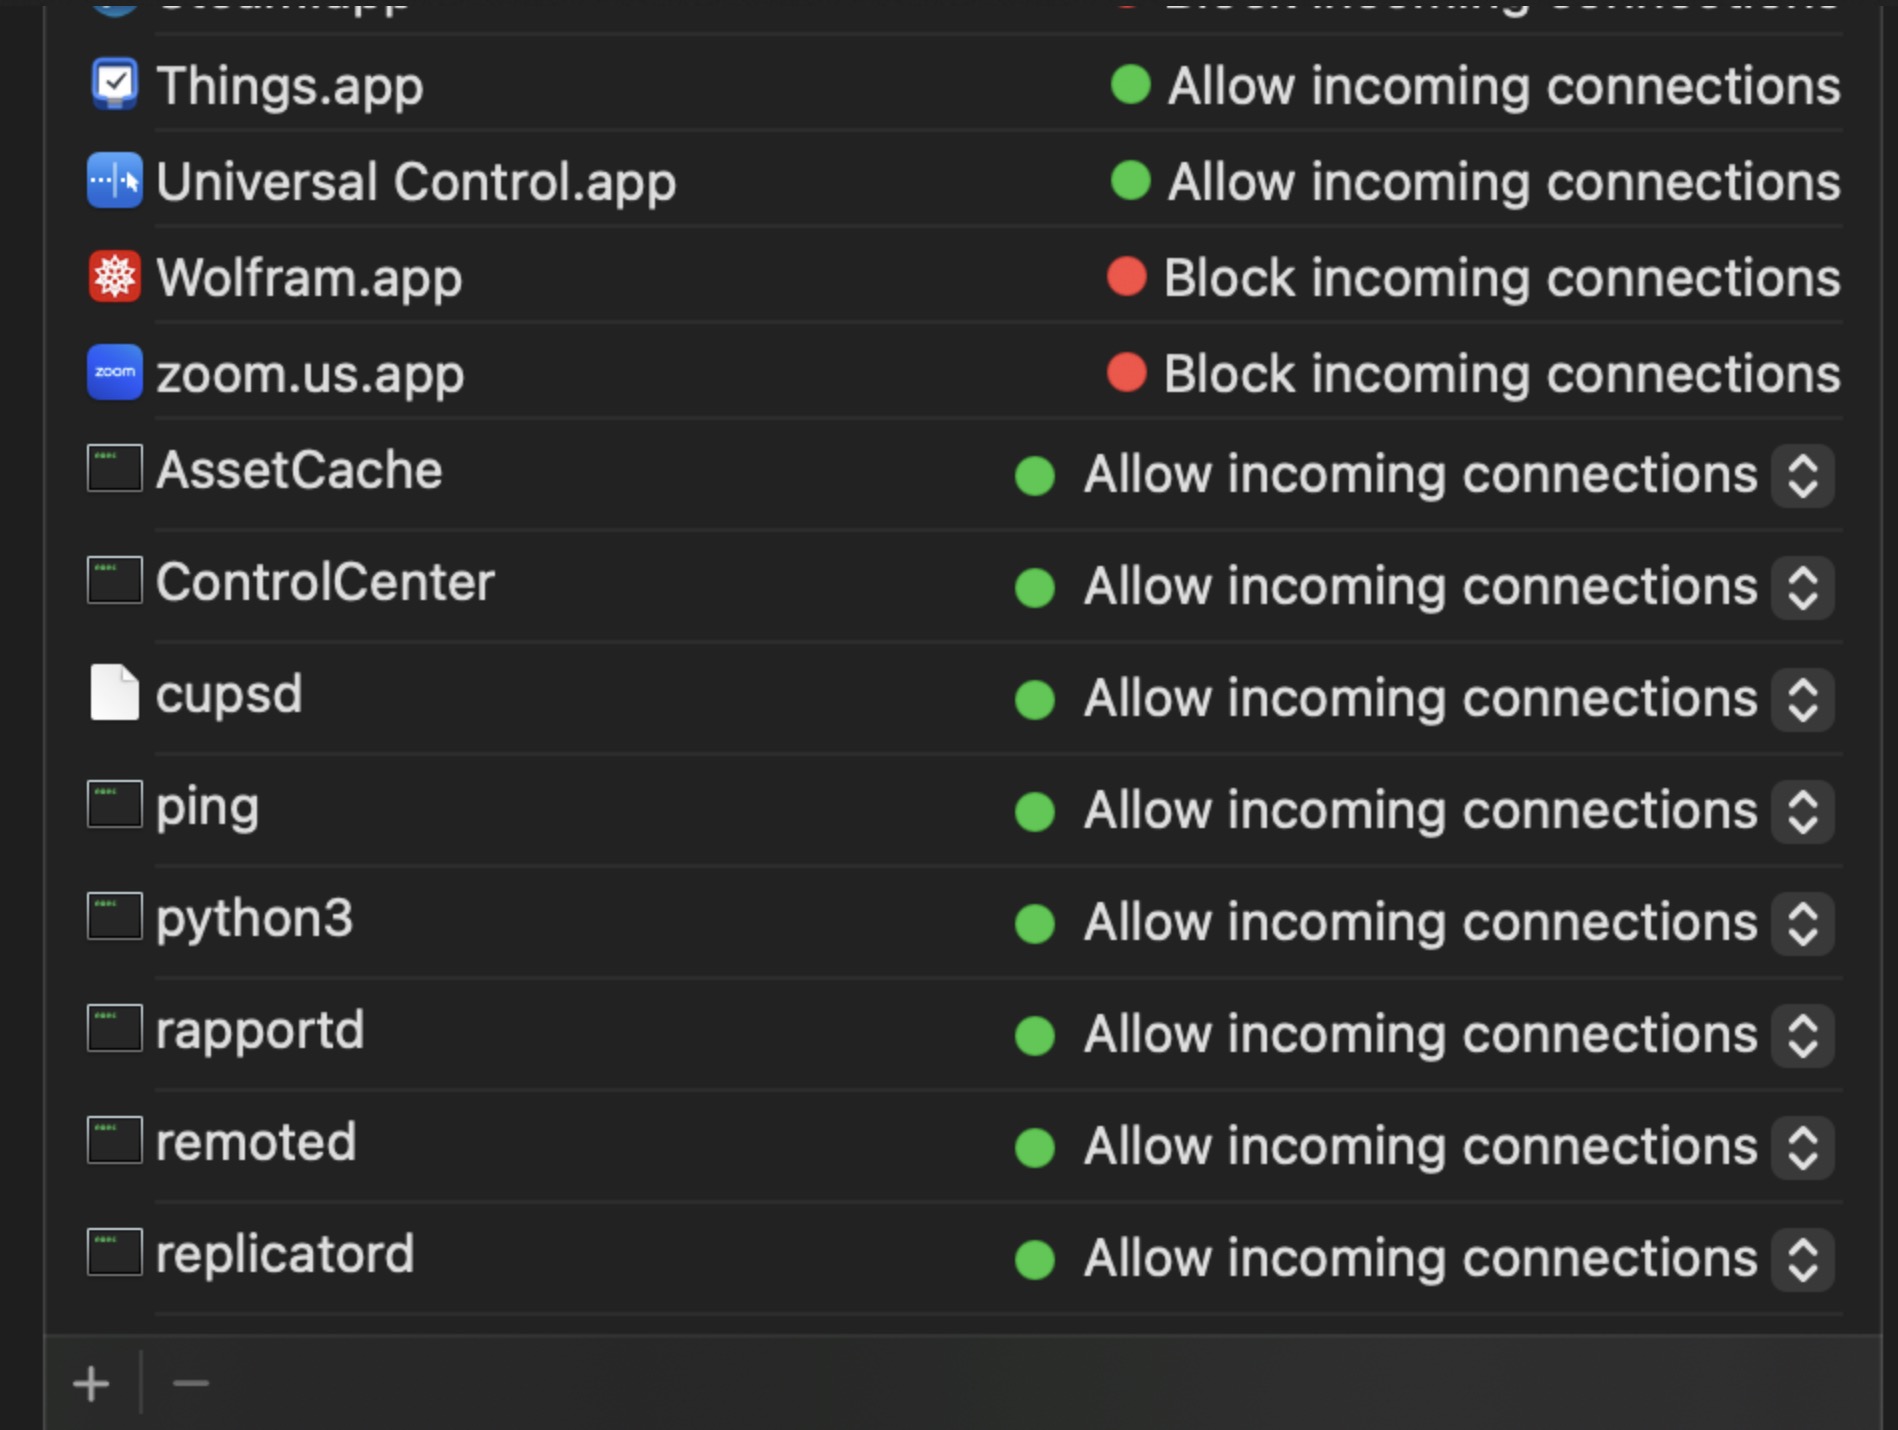
After upgrading to MacOS Sequoia (MacOS 15), many users have encountered issues with the built-in firewall. Specifically, users report being unable to edit certain firewall entries, and in some cases, the firewall is blocking apps like Firefox, Chrome and Terminal from accessing the internet, even after permissions are granted. These problems have caused frustration among users relying on these applications for daily use.

What's the Problem?

The firewall in MacOS Sequoia appears to have a bug that blocks outgoing and incoming connections for several apps, despite users allowing them through the firewall settings. Some apps that should be allowed, such as web browsers are automatically blocked, and the firewall does not permit users to modify these entries. This issue has been particularly prominent among users who had the firewall enabled before upgrading from previous MacOS versions.

Several reports indicate that:

  • Apps like Firefox and Chrome stop working unless the firewall is disabled
  • Manually adding or modifying firewall rules often doesn’t persist after restarting the system
  • The issue is likely a bug introduced in McOS Sequoia that has yet to be patched
Sequoia Firewall Rules
Temporary Workaround:

While we are all eagerly waiting for an official update from Apple but there are a few workarounds that can be used to temporarily fix the issue:

1. Manually Whitelist App:

You can use following Terminal command to add applications to the firewall exceptions list, bypassing the issues in the graphical user interface (GUI).

					sudo /usr/libexec/ApplicationFirewall/socketfilterfw --add /Applications/<ApplicationName>.app

## few examples ##

# terminal
sudo /usr/libexec/ApplicationFirewall/socketfilterfw --add /System/Applications/Utilities/Terminal.app

# firefox
sudo /usr/libexec/ApplicationFirewall/socketfilterfw --add /Applications/Frefox.app

# google chrome
sudo /usr/libexec/ApplicationFirewall/socketfilterfw --add /Applications/Google\ Chrome.app

# safari
sudo /usr/libexec/ApplicationFirewall/socketfilterfw --add /Applications/Safari.app

# microsoft edge
sudo /usr/libexec/ApplicationFirewall/socketfilterfw --add /Applications/Microsoft\ Edge.app

# slack
sudo /usr/libexec/ApplicationFirewall/socketfilterfw --add /Applications/Slack.app

# photoshop
sudo /usr/libexec/ApplicationFirewall/socketfilterfw --add /Applications/Adobe\ Photoshop\ 2024/Adobe\ Photoshop\ 2024.app


2. Disable the Firewall:

If the terminal command doesn’t work, or if the issue persists across multiple apps, you can temporarily disable the firewall:

  1. Go to System Settings > Network > Firewall.
  2. Click the padlock to unlock the settings and disable the firewall.

While this is not an ideal solution but it allows your apps to function until Apple releases an official patch.

Conclusion

This firewall issue highlights the importance of thoroughly testing system updates, particularly when they affect critical tools like security settings. While disabling the firewall isn’t an ideal solution, it’s a necessary step for many users until Apple rolls out a permanent fix.

Keep following updates from Apple and trusted tech sources to stay informed about when this issue will be resolved.

For now, these workarounds should help you maintain functionality while keeping your apps running smoothly in MacOS Sequoia

A Guide to TCC Services on macOS Sequoia 15.0

macOS Sequoia 15.0 Privacy & Security Services
Basics of TCC Services on macOS

MacOS is known for its strong privacy and security features. One of the ways it ensures users are in control of their data and system resources is through TCC (Transparency, Consent, and Control) services. These services govern which apps can access sensitive information or interact with system-level resources such as your camera, microphone, contacts, and more. If you’ve ever used an app on MacOS and were asked for permission to access something like your location or calendar, that interaction is managed by the TCC framework.

In this guide, we’ll explore what TCC services are, why they matter, and complete list of all services of MacOS Sequoia 15.0.

What Are TCC Services?

TCC services control the permissions that apps request on MacOS. When an app tries to access something sensitive like your microphone or contacts, MacOS prompts you to grant or deny that access. This is a key part of how MacOS maintains user privacy and transparency, ensuring that apps only gain access to what you’ve approved.

These permissions cover a wide array of services, including:

  • Camera: Needed by apps like Zoom, FaceTime, or photo editors.
  • Microphone: Used by apps for recording audio, video conferencing, or speech recognition.
  • Contacts: Apps such as messaging platforms or email clients often need access to your contacts.
  • Bluetooth: Apps connecting to wireless accessories like headphones, speakers, or fitness devices will require Bluetooth permissions.

TCC services are essential to keeping apps from overstepping their boundaries, making sure that any sensitive data access is done with your explicit consent.

Role of TCC Services

The primary role of TCC services is to ensure that users remain in control of their privacy, preventing apps from accessing information they don’t have permission for. With cyber threats and data privacy concerns rising, having these checks and balances in place is critical.

For instance, without TCC services, an app could theoretically access your camera or microphone without you knowing. TCC database is protected by SIP and designed in such a way that, even a user with root permissions cannot modify it. MacOS will always prompt you before an app can use these features, making sure your device and personal data are secure.

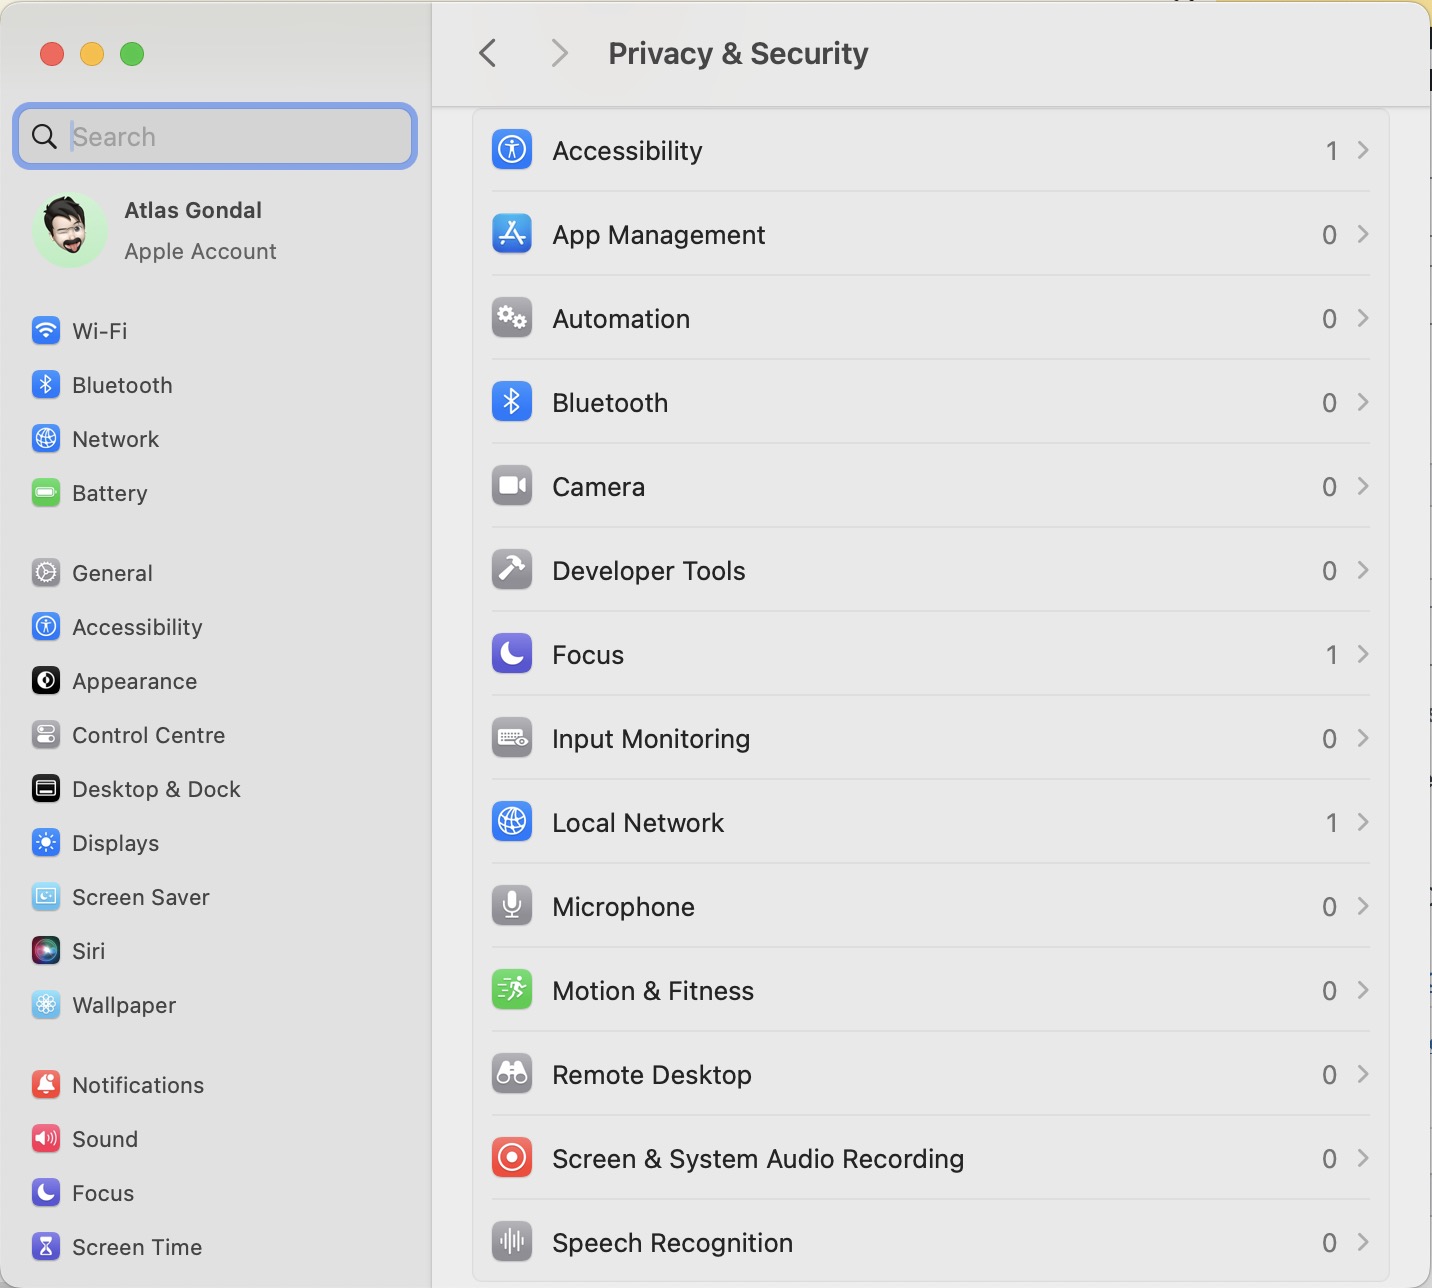
TCC services also help maintain transparency. You can always review which apps have access to which services in System Settings > Privacy & Security > Privacy. This also allows you to revoke permissions from any app that you no longer trust.

List of TCC Services on MacOS Sequoia 15.0
TCC Service
Description
kTCCService
General TCC service identifier.
kTCCServiceAccessibility
Allows client to control computer.
kTCCServiceAddressBook
Allows access to the address book (contacts).
kTCCServiceAll
Provides access to all TCC services.
kTCCServiceAppleEvents
Grants access to send Apple Events.
kTCCServiceAudioCapture
Allows capturing audio input.
kTCCServiceBluetoothAlways
Allows Bluetooth access at all times.
kTCCServiceBluetoothPeripheral
Grants access to Bluetooth peripherals.
kTCCServiceBluetoothWhileInUse
Allows Bluetooth access only while in use.
kTCCServiceCalendar
Grants access to the calendar.
kTCCServiceCalls
Provides access to call-related features.
kTCCServiceCamera
Client would like to access the camera.
kTCCServiceContactlessAccess
Allows access to contactless device features.
kTCCServiceContactsFull
Grants full access to contacts.
kTCCServiceContactsLimited
Allows limited access to contacts.
kTCCServiceCrashDetection
Provides access to crash detection features.
kTCCServiceDeveloperTool
Access to developer tools and debugging features.
kTCCServiceEndpointSecurityClient
Allows access to endpoint security services.
kTCCServiceExposureNotification
Grants access to exposure notifications (e.g., COVID alerts).
kTCCServiceExposureNotificationRegion
Region-specific exposure notification services.
kTCCServiceFSKitBlockDevice
Access to block device management in FSKit.
kTCCServiceFaceID
Allows access to FaceID services.
kTCCServiceFacebook
Provides integration with Facebook services.
kTCCServiceFallDetection
Grants access to fall detection features.
kTCCServiceFileProviderDomain
Allows access to file provider domains.
kTCCServiceFileProviderPresence
Provides access to file provider presence data.
kTCCServiceFinancialData
Grants access to financial data.
kTCCServiceFocusStatus
Allows checking the user’s Focus Status.
kTCCServiceGameCenterFriends
Grants access to Game Center friends.
kTCCServiceKeyboardNetwork
Allows keyboard network access.
kTCCServiceLinkedIn
Provides integration with LinkedIn services.
kTCCServiceListenEvent
Access to listen to system-level events.
kTCCServiceLiverpool
Internal service identifier related to Liverpool feature.
kTCCServiceMSO
Grants access to mobile service operator features.
kTCCServiceMediaLibrary
Access to the user’s media library.
kTCCServiceMicrophone
Client would like to access the microphone.
kTCCServiceMotion
Provides access to motion sensors and data.
kTCCServiceNearbyInteraction
Grants access to nearby interaction services.
kTCCServicePasteboard
Allows access to the clipboard (pasteboard) data.
kTCCServicePhotos
Client would like to access the photos library.
kTCCServicePhotosAdd
Allows adding photos to the library.
kTCCServicePostEvent
Provides ability to post events to the system.
kTCCServicePrototype3Rights
Internal service identifier for prototype rights (version 3).
kTCCServicePrototype4Rights
Internal service identifier for prototype rights (version 4).
kTCCServiceReminders
Grants access to reminders.
kTCCServiceRemoteDesktop
Allows access to remote desktop features.
kTCCServiceScreenCapture
Provides access to screen capture capabilities.
kTCCServiceSecureElementAccess
Grants access to secure element (e.g., NFC) functions.
kTCCServiceSensorKitAmbientLightSensor
Provides access to ambient light sensor data.
kTCCServiceSensorKitBedSensing
Allows access to bed sensing data.
kTCCServiceSensorKitBedSensingWriting
Grants ability to write bed sensing data.
kTCCServiceSensorKitDeviceUsage
Provides access to device usage data.
kTCCServiceSensorKitElevation
Grants access to elevation sensor data.
kTCCServiceSensorKitFacialMetrics
Allows access to facial metrics data.
kTCCServiceSensorKitForegroundAppCategory
Grants access to foreground app category data.
kTCCServiceSensorKitHistoricalCardioMetrics
Allows access to historical cardio metrics.
kTCCServiceSensorKitHistoricalMobilityMetrics
Grants access to historical mobility metrics.
kTCCServiceSensorKitKeyboardMetrics
Provides access to keyboard metrics.
kTCCServiceSensorKitLocationMetrics
Allows access to location metrics data.
kTCCServiceSensorKitMessageUsage
Grants access to message usage data.
kTCCServiceSensorKitMotion
Provides access to motion sensor data.
kTCCServiceSensorKitMotionHeartRate
Grants access to heart rate metrics via motion sensors.
kTCCServiceSensorKitOdometer
Allows access to odometer data.
kTCCServiceSensorKitPedometer
Grants access to pedometer data.
kTCCServiceSensorKitPhoneUsage
Provides access to phone usage data.
kTCCServiceSensorKitSoundDetection
Allows access to sound detection services.
kTCCServiceSensorKitSpeechMetrics
Grants access to speech metrics.
kTCCServiceSensorKitStrideCalibration
Allows stride calibration via sensors.
kTCCServiceSensorKitWatchAmbientLightSensor
Provides access to watch’s ambient light sensor data.
kTCCServiceSensorKitWatchFallStats
Grants access to fall statistics via the watch.
kTCCServiceSensorKitWatchForegroundAppCategory
Allows access to the foreground app category on watch.
kTCCServiceSensorKitWatchHeartRate
Grants access to heart rate metrics via the watch.
kTCCServiceSensorKitWatchMotion
Provides access to watch motion sensor data.
kTCCServiceSensorKitWatchOnWristState
Allows access to the on-wrist state of the watch.
kTCCServiceSensorKitWatchPedometer
Grants access to watch pedometer data.
kTCCServiceSensorKitWatchSpeechMetrics
Provides access to speech metrics via the watch.
kTCCServiceSensorKitWristTemperature
Allows access to wrist temperature sensor data.
kTCCServiceShareKit
Grants access to ShareKit services for content sharing.
kTCCServiceSinaWeibo
Provides integration with Sina Weibo services.
kTCCServiceSiri
Grants access to Siri-related services.
kTCCServiceSpeechRecognition
Allows access to speech recognition features.
kTCCServiceSystemPolicyAllFiles
Grants access to all system files.
kTCCServiceSystemPolicyAppBundles
Allows access to application bundles.
kTCCServiceSystemPolicyAppData
Grants access to app-specific data.
kTCCServiceSystemPolicyDesktopFolder
Allows access to the desktop folder.
kTCCServiceSystemPolicyDeveloperFiles
Grants access to developer-related files.
kTCCServiceSystemPolicyDocumentsFolder
Allows access to the documents folder.
kTCCServiceSystemPolicyDownloadsFolder
Provides access to the downloads folder.
kTCCServiceSystemPolicyNetworkVolumes
Grants access to network volumes.
kTCCServiceSystemPolicyRemovableVolumes
Allows access to removable volumes.
kTCCServiceSystemPolicySysAdminFiles
Grants access to system administration files.
kTCCServiceTencentWeibo
Provides integration with Tencent Weibo services.
kTCCServiceTwitter
Allows integration with Twitter services.
kTCCServiceUbiquity
Grants access to iCloud ubiquity services.
kTCCServiceUserAvailability
Allows access to user availability information.
kTCCServiceUserTracking
Provides access to user tracking services.
kTCCServiceVirtualMachineNetworking
Grants access to virtual machine networking services.
kTCCServiceVoiceBanking
Allows access to voice banking services.
kTCCServiceWebBrowserPublicKeyCredential
Grants access to public key credentials for web browsers.
kTCCServiceWebKitIntelligentTrackingPrevention
Provides WebKit intelligent tracking prevention services.
kTCCServiceWillow
Internal service identifier related to Willow feature.

* Check the complete list on Github.

Fetching the Latest TCC Service List

Apple can change TCC services without any notice. You can follow below guidelines to fetch the latest list of TCC services on your system.

					```bash
cd /System/Library/PrivateFrameworks/TCC.framework/Support
strings tccd | grep -iEo "^kTCCService.*" | sort
```
				
Practical Uses of TCC Services

TCC services are used in a variety of scenarios:

  • Developers: Need to understand how their apps will request permissions for certain functionalities, such as accessing the camera for a video-calling app.
  • Security-conscious users: May want to ensure that no apps have been granted unnecessary access to sensitive data, like their contacts or messages.
  • Everyday macOS users: Should familiarize themselves with how to control app permissions to maintain their privacy, especially when downloading new apps.
Final Thoughts

The TCC framework plays a crucial role in keeping MacOS users safe by providing transparency and control over the data and services apps can access. As a user, understanding these services and how to manage them is essential to ensuring your privacy.

Remember that the list of TCC services may change over time as MacOS evolves, and new services are introduced. If you’re using a version of MacOS newer than Sequoia 15.0, you can check for updated services by querying the TCC database to ensure you have the latest permissions and settings. And while most services have been confirmed, not all of them are manually verified, so if you encounter any discrepancies, it’s a good idea to report them.

Taking the time to manage TCC permissions will give you peace of mind and help protect your personal information on your Mac Operating System.